Authentication and authorization
Strong authentication and authorization methods are vital for a modern, multiuser web application. While they are often used interchangeably, authentication and authorization are separate processes:
Authentication confirms that users are who they say they are
Authorization gives those users permission to access a resource
Authentication using Auth
py4web comes with a an object Auth and a system of plugins for user
authentication. It has the same name as the
corresponding web2py one and serves the same purpose but the API and
internal design is very different.
The _scaffold application provides a guideline for its standard usage. By default it uses a local SQLite database and allows creating new users, login and logout. Notice that if you don’t configure it, you have to manually approve new users (by visiting the link logged on the console or by directly editing the database).
To use the Auth object, first of all you need to import it, instantiate it, configure it, and enable it.
from py4web.utils.auth import Auth
auth = Auth(session, db)
# (configure here)
auth.enable()
The import step is obvious. The second step does not perform any
operation other than telling the Auth object which session object to use
and which database to use. Auth data is stored in session['user']
and, if a user is logged in, the user id is stored in
session[‘user’][‘id’]. The db object is used to store persistent info
about the user in a table auth_user which is created if missing.
The auth_user table has the following fields:
username
email
password
first_name
last_name
sso_id (used for single sign on, see later)
action_token (used to verify email, block users, and other tasks, also see later).
The auth.enable() step creates and exposes the following RESTful
APIs:
{appname}/auth/api/register (POST)
{appname}/auth/api/login (POST)
{appname}/auth/api/request_reset_password (POST)
{appname}/auth/api/reset_password (POST)
{appname}/auth/api/verify_email (GET, POST)
{appname}/auth/api/logout (GET, POST) (+)
{appname}/auth/api/profile (GET, POST) (+)
{appname}/auth/api/change_password (POST) (+)
{appname}/auth/api/change_email (POST) (+)
Those marked with a (+) require a logged in user.
Auth UI
You can create your own web UI to login users using the above APIs but py4web provides one as an example, implemented in the following files:
_scaffold/templates/auth.html
_scaffold/templates/layout.html
The key section is in layout.html where (using the no.css framework) the menu actions are defined:
 1<ul>
 2   [[if globals().get('user'):]]
 3   <li>
 4   <a class="navbar-link is-primary">
 5      [[=globals().get('user',{}).get('email')]]
 6   </a>
 7   <ul>
 8      <li><a href="[[=URL('auth/profile')]]">Edit Profile</a></li>
 9      [[if 'change_password' in globals().get('actions',{}).get('allowed_actions',{}):]]
10         <li><a href="[[=URL('auth/change_password')]]">Change Password</a></li>
11      [[pass]]
12      <li><a href="[[=URL('auth/logout')]]">Logout</a></li>
13   </ul>
14   </li>
15   [[else:]]
16   <li>
17   Login
18   <ul>
19      <li><a href="[[=URL('auth/register')]]">Sign up</a></li>
20      <li><a href="[[=URL('auth/login')]]">Log in</a></li>
21   </ul>
22   </li>
23   [[pass]]
24</ul>
The menu is dynamic: on line 2 there is a check if the user is already defined
(i.e. if the user has already logged on). In this case the email is shown in the
top menu, plus the menu options Edit Profile, Change Password (optional) and
Logout.
Instead, if the user is not already logged on, from line 15 there are
only the corresponding menu options allowed: Sign up and Log in.
Every menu option then redirects the user to the corresponding standard URL, which in turn activates the Auth action.
Using Auth inside actions
There two ways to use the Auth object in an action.
The first one does not force a login. With @action.uses(auth)
we tell py4web that this action should have information about the user,
trying to parse the session for a user session.
@action('index')
@action.uses(auth)
def index():
    user = auth.get_user()
    return 'hello {first_name}'.format(**user) if user else 'not logged in'
The second one forces the login if needed:
@action('index')
@action.uses(auth.user)
def index():
    user = auth.get_user()
    return 'hello {first_name}'.format(**user)
Here @action.uses(auth.user) tells py4web that this action requires
a logged in user and should redirect to login if no user is logged in.
Two Factor Authentication
Two factor authentication (or Two-step verification) is a way of improving authentication security. When activated an extra step is added in the login process. In the first step, users are shown the standard username/password form. If they successfully pass this challenge by submitting the correct username and password, and two factor authentication is enabled for the user, the server will present a second form before logging them in.
There are a few Auth settings available to control how two factor authentication works.
The following can be specified on Auth instantiation:
two_factor_requiredtwo_factor_sendtwo_factor_validate
two_factor_required
When you pass a method name to the two_factor_required parameter you are telling py4web to call
that method to determine whether or not this login should be use or bypass two factor authentication.
If your method returns True, then this login requires two factor. If it returns False, two factor authentication
is bypassed for this login.
Sample two_factor_required method
This example shows how to allow users that are on a specific network.
def user_outside_network(user, request):
    import ipaddress

    networks = ["10.10.0.0/22"]

    ip_list = []
    for range in networks:
        ip_list.extend(ipaddress.IPv4Network(range))

    if ipaddress.IPv4Address(request.remote_addr) in ip_list:
        #  if the client address is in the network address list, then do NOT require MFA
        return False

    return True
two_factor_send
When two factor authentication is active, py4web can generate a 6 digit code (using random.randint) and
makes it possible to send it to the user. How this code is sent, is up to you. The two_factor_send
argument to the Auth class allows you to specify the method that sends the two factor code to the user.
This example shows how to send an email with the two factor code:
def send_two_factor_email(user, code):
    try:
        auth.sender.send(
            to=[user.email],
            subject=f"Two factor login verification code",
            body=f"You're verification code is {code}",
            sender="from_address@youremail.com",
        )
    except Exception as e:
        print(e)
    return code
Notice that this method takes two arguments: the current user, and the code to be sent. Also notice this method can override the code and return a new one.
auth.param.two_factor_required = user_outside_network
auth.param.two_factor_send = send_two_factor_email
two_factor_validate
By default, py4web will validate the user input in the two factor form by comparing the code entered
by the user with the code generated and sent using two_factor_send. However, sometimes it may be
useful to define a custom validation of this user-entered code. For instance, if one would like to use the
TOTP (or the Time-Based One-Time-Passwords) as the two factor authentication method, the validation
requires comparing the code entered by the user with the value generated at the same time at the server side.
Hence, it is not sufficient to generate that value earlier when showing the form (using for instance
two_factor_send method), because by the time the user submits the form, the current valid value may
already be different. Instead, this value should be
generated when validating the form submitted by the user.
To accomplish such custom validation, the two_factor_validate method is available. It takes two arguments:
the current user
the code that was entered by the user into the two factor authentication form
The primary use-case for this method is validation of time-based passwords.
This example shows how to validate a time-based two factor code:
def validate_code(user, code):
   try:
      # get the correct code from an external function
      correct_code = generate_time_based_code(user_id)
   except Exception as e:
      # return None to indicate that validation could not be performed
      return None

   # compare the value entered in the auth form with the correct code
   if code == correct_code:
      return True
   else:
      return False
The validate_code method must return one of three values:
True- if the validation succeeded,False- if the validation failed,None- if the validation was not possible for any reason
Notice that - if defined - this method is _always_ called to validate the two factor
authentication form. It is up to you to decide what kind of validation it does. If the returned value is True,
the user input will be accepted as valid. If the returned value is False then the user input will be
rejected as invalid, number of tries will be decreased by one, and user will be asked to try again.
If the returned value is None the user input will be checked against the code generated with the use
of two_factor_send method and the final result will depend on that comparison. In this case authentication
will fail if two_factor_send method was not defined, and hence no code was sent to the user.
auth.param.two_factor_validate = validate_code
two_factor_tries
By default, the user has 3 attempts to pass two factor authentication. You can override this after using:
auth.param.two_factor_tries = 5
Once this is all setup, the flow for two factor authentication is:
present the login page
- upon successful login and user passes two_factor_required
redirect to py4web auth/two_factor endpoint
- if
two_factor_sendmethod has been defined: generate 6 digit verification code
call
two_factor_sendto send the verification code to the user
- if
display verification page where user can enter their code
if
two_factor_validatemethod has been defined - call it to validate the user-entered codeupon successful verification, take user to _next_url that was passed to the login page
Important! If you filtered ALLOWED_ACTIONS in your app, make sure to whitelist the “two_factor” action
so not to block the two factor API.
Auth Plugins
Plugins are defined in “py4web/utils/auth_plugins” and they have a hierarchical structure. Some are exclusive and some are not. For example, default, LDAP, PAM, and SAML are exclusive (the developer has to pick one). Default, Google, Facebook, and Twitter OAuth are not exclusive (the developer can pick them all and the user gets to choose using the UI).
The <auth/> components will automatically adapt to display login
forms as required by the installed plugins.
In the _scaffold/settings.py and _scaffold/common.py files you can see the default settings for the supported plugins.
PAM
Configuring PAM is the easiest:
from py4web.utils.auth_plugins.pam_plugin import PamPlugin
auth.register_plugin(PamPlugin())
This one like all plugins must be imported and registered. The constructor of this plugins does not require any arguments (where other plugins do).
The auth.register_plugin(...) must come before the
auth.enable() since it makes no sense to expose APIs before desired
plugins are mounted.
Note
by design PAM authentication using local users works fine only if py4web is run by root. Otherwise you can only authenticate the specific user that runs the py4web process.
LDAP
This is a common authentication method, especially using Microsoft Active Directory in enterprises.
from py4web.utils.auth_plugins.ldap_plugin import LDAPPlugin
LDAP_SETTING = {
    'mode': 'ad',
    'server': 'my.domain.controller',
    'base_dn': 'cn=Users,dc=domain,dc=com'
}
auth.register_plugin(LDAPPlugin(**LDAP_SETTINGS))
Warning
it needs the python-ldap module. On Ubuntu, you should also install some developer’s libraries
in advance with sudo apt-get install libldap2-dev libsasl2-dev.
OAuth2 with Google
from py4web.utils.auth_plugins.oauth2google import OAuth2Google # TESTED
auth.register_plugin(OAuth2Google(
    client_id=CLIENT_ID,
    client_secret=CLIENT_SECRET,
    callback_url='auth/plugin/oauth2google/callback'))
The client id and client secret must be provided by Google.
By default, Google OAuth stores the user’s first name, last name, and email in the auth_user table—but not the profile picture. You can include the profile picture URL with just few lines of code added to common.py.
from py4web.utils.auth_plugins.oauth2google import OAuth2Google  # TESTED
...
auth = Auth(session, db, define_tables=False)
auth.extra_auth_user_fields = [
   Field('profile_picture', 'text', readable=False, writable=False)
]
...
OAuth2Google.maps['profile_picture'] = 'picture'
Once the profile picture URL is stored in auth_user, you can easily use it along with other user information.
OAuth2 with Facebook
from py4web.utils.auth_plugins.oauth2facebook import OAuth2Facebook # UNTESTED
auth.register_plugin(OAuth2Facebook(
    client_id=CLIENT_ID,
    client_secret=CLIENT_SECRET,
    callback_url='auth/plugin/oauth2google/callback'))
The client id and client secret must be provided by Facebook.
OAuth2 with Discord
from py4web.utils.auth_plugins.oauth2discord import OAuth2Discord
auth.register_plugin(OAuth2Discord(
    client_id=DISCORD_CLIENT_ID,
    client_secret=DISCORD_CLIENT_SECRET,
    callback_url="auth/plugin/oauth2discord/callback"))
To obtain a Discord client ID and secret, create an application at https://discord.com/developers/applications.
You will also have to register your OAuth2 redirect URI in your created application, in the form of
http(s)://<your host>/<your app name>/auth/plugin/oauth2discord/callback
Note
As Discord users have no concept of first/last name, the user in the auth table will contain the Discord username as the first name and discriminator as the last name.
Auth API Plugins
There are two types of web APIs, those called by the browser for example by a single page web app, and those designed to be called by a different kind of program. Both of them may need tosupport authentication. The distintion is important because, in the case of the browser, there is no need to manage any authentication token as the browser already provides cookies and py4web uses cookies to handle seesions. If the user operating the browser is logged-in, when an API is called, the corresponding action already knows who the user is. No additional logic is necessary. In this case there there is no need for any kind of additional API token which would only diminuish the security provided by the cookie based session token.
When the API is to be accessed by a different program (for example a script) the story is different. There is no session and we do not want to ask the user for the password every time. The standard way to authenticate in this case is by issuing the user an API token, aka a string, which, when presented along with API request allows py4web to recognize the identity of the caller. This is also referred to as “Authentication bearer”.
Py4web provides a plugin system that gives you a lot of flexibility but it also provides two practical plugins that are sufficient in most cases. The two plugins are called: SimpleTokenPlugin and JwtTokenPlugin. The first one of the two is recommended in most of the cases.
What all plugins have in common:
They have a way for a user to create a token which is a string.
When an HTTP(S) request is made to an action that @actiion.uses(auth) or @action.uses(auth.user) py4web will identify the user if the token is present, as if the user was logged-in.
What SimpleTokenPlugin and JwtTokenPlugin have in common:
When an HTTP(S) request is made, the token must be put in the “Authentication” header. You will need to create your own plugin if you want to pass it in some other manner.
Each user can create as many tokens as desired.
Users can create tokens for other users if the application logic requires/allows it.
Unique features of SimpleTokenPlugin:
A token is a UUID.
Tokens can be managed serverside (created, deleted, expired, change expiration).
Current tokens are stored in a adatabase table.
The default table associates token with the owner and a textual description. Users can nevertheless provide their own table and add any desired metadata to tokens which the app can retrieve to distinguish different tokens from the same user. This is done by adding fields to the table.
Under the hood veryfing a token requires a database query.
Unique features of JwtTokenPlugin:
The token is an encrypted and digitally signed dict that stores the user_id and expiration.
The author of the token can add any metadata to into the token at creation.
The token is not stored anywhere serverside and there is no database table.
Tokens can be created (and there is a function to do so) but they cannot be managed. The server cannot expire tokens or change expiration. This would require the tokens to validated against a database and that is exactely when the JwtTokenPlugin tries to avoid.
The only way to expire a token is by changing the serverside secret using for validation so when a token is expired, all tokens are expired.
SimpleTokenPlugin are the recommended kind of tokens for most applications. JwtTokenPlugin are valuable when the expiration is short and known in advance and when avoiding a database lookup is very important, such as for actions that are very fast and one is willing to sacrifice a bit of security (serverside token expiration capability) in order to avoid database access.
Example of SimpleTokenPlugin
In common.py:
from py4web.utils.auth import SimpleTokenPlugin
simple_token_plugin = SimpleTokenPlugin(auth)
auth.token_plugins.append(simple_token_plugin)
You can optionally a table=db.mytable to a custom table. Otherwise it will create and use
one called “auth_simple_token”.
In controllers.py
@action("test_api")
@action.uses(auth.user)
def test_api():
    return {"hello": "world"}
Users can access this action if via a browser if they are logged in, without the token, of via API by providing a token.
curl http://127.0.0.1:8000/test1/test_api -H "Authorization: Bearer {token}"
In order to create and manage tokens you can use a grid. In controllers.py
@action("tokens")
def _():
   db.auth_simple_token.user_id.default = auth.user_id
   grid = Grid(db.auth_simple_token.user_id==auth.user_id, create=True, deletable=True)
   return dict(grid=grid)
Example of JwtTokenPlugin
In common.py:
from py4web.utils.auth import SimpleTokenPlugin
jwt_token_plugin = JwtTokenPlugin(auth)
auth.token_plugins.append(jwt_token_plugin)
In controllers.py it works the same as SimpleTokenPlugin:
@action("test_api")
@action.uses(auth.user)
def test_api():
    return {"hello": "world"}
The token is also passed using the same header as in the previous example:
curl http://127.0.0.1:8000/test1/test_api -H "Authorization: Bearer {token}"
While you cannot manage tokens you still need a way to create them. You can create an action for example that, when called, gives you a new token. In controllers.py
@action("make_token")
@action.uses("generic.html", auth.user)
def make_token():
     return dict(token=jwt_token_plugin.make(
        auth.current_user,
        expiration=utcnow()+datetime.timedelta(days=10)))
Example of custom Token Plugin
A token plugin is just a class that, given a request, returns an associated user. For example here is a dumb and UNSAFE plugin that authorizes everybody as user 1 as long as the “Authentication” header is provided.
from py4web import request
class MyCustomTokenPlugin:
    def get_user(self):
        authorization = request.headers.get("Authentication")
        if authorization:
            return db.auth_user(1)
        return None

auth.token_plugins.append(MyCustomTokenPlugin())
Authorization using Tags
As already mentioned, authorization is the process of verifying what specific
applications, files, and data a user has access to. This is accomplished
in py4web using Tags, that we’ve already discovered on Tagging records
in the DAL chapter.
Tags and Permissions
Py4web provides a general purpose tagging mechanism that allows the developer to tag any record of any table, check for the existence of tags, as well as checking for records containing a tag. Group membership can be thought of a type of tag that we apply to users. Permissions can also be tags. Developers are free to create their own logic on top of the tagging system.
Note
Py4web does not have the concept of groups as web2py does. Experience showed that while that mechanism is powerful it suffers from two problems: it is overkill for most apps, and it is not flexible enough for very complex apps.
To use the tagging system you first need to import the Tags module
from pydal.tools. Then create a Tags object to tag a table:
from pydal.tools.tags import Tags
groups = Tags(db.auth_user, 'groups')
The tail_name parameter is optional and if not specified the ‘default’
value will be used. If you look at the database level, a new table will
be created with a name equals to tagged_db + '_tag_' + tail_name,
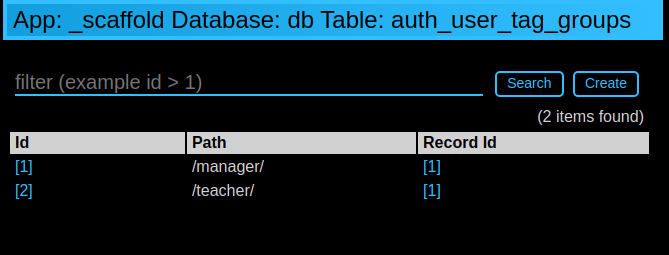
in this case auth_user_tag_groups:

Then you can add one or more tags to records of the table as well as remove existing tags:
groups.add(user.id, 'manager')
groups.add(user.id, ['dancer', 'teacher'])
groups.remove(user.id, 'dancer')
On the auth_user_tagged_groups this will produce two records
with different groups assigned to the same user.id (the “Record ID” field):
Slashes at the beginning or the end of a tag are optional. All other chars are allowed on equal footing.
A common use case is group based access control. Here the developer
first checks if a user is a member of the 'manager' group, if the
user is not a manager (or no one is logged in) py4web redirects to the
'not authorized url'. Else the user is in the correct group and then
py4web displays ‘hello manager’:
@action('index')
@action.uses(auth.user)
def index():
    if not 'manager' in groups.get(auth.get_user()['id']):
        redirect(URL('not_authorized'))
    return 'hello manager'
Here the developer queries the db for all records having the desired tag(s):
@action('find_by_tag/{group_name}')
@action.uses(db)
def find(group_name):
    users = db(groups.find([group_name])).select(orderby=db.auth_user.first_name | db.auth_user.last_name)
    return {'users': users}
We’ve already seen a simple requires_membership fixture on :ref:The Condition fixture. It
enables the following syntax:
groups = Tags(db.auth_user)

class requires_membership(Fixture):
    def __init__(self, group):
        self.__prerequisites__ = [auth.user] # you must have a user before you can check
        self.group  = group # store the group when action defined
    def on_request(self, context): # will be called if the action is called
        if self.group not in groups.get(auth.user_id):
            raise HTTP(401) # check and do something

@action('index')
@action.uses(requires_membership('teacher'))
def index():
    return 'hello teacher'
We leave it to you as an exercise to create a fixture has_membership
to enable the following syntax:
@action('index')
@action.uses(has_membership(groups, 'teacher'))
def index():
    return 'hello teacher'
Important: Tags are automatically hierarchical. For example, if
a user has a group tag ‘teacher/high-school/physics’, then all the
following searches will return the user:
groups.find('teacher/high-school/physics')groups.find('teacher/high-school')groups.find('teacher')
This means that slashes have a special meaning for tags.
User Impersonation
Auth provides API that allow you to impersonate another user. Here is an example of an action to start impersonating and stop impersonating another user.
@action("impersonate/{user_id:int}", method="GET")
@action.uses(auth.user)
def start_impersonating(user_id):
    if (not auth.is_impersonating() and
        user_id and
        user_id != auth.user_id and
        db(db.auth_user.id==user_id).count()):
        auth.start_impersonating(user_id, URL("index"))
    raise HTTP(404)

 @action("stop_impersonating", method="GET")
 @action.uses(auth)
 def stop_impersonating():
    if auth and auth.is_impersonating():
        auth.stop_impersonating(URL("index"))
    redirect(URL("index"))