Installation and Startup
Understanding the design
Before everything else it is important to understand that unlike other web frameworks, is not only a python module that can be imported by apps. It is also a program that is in charge of starting some apps. For this reason you need two things:
The py4web module (which you download from our web site, from pypi or from github)
One or more folders containing collections of apps you want to run.
py4web has command line options to create a folder with some example apps, to initialize an existing folder, and to add scaffolding apps to that folder. Once installed you can have multiple apps under the same folder running concurrently and served by the same py4web process at the same address and port. An apps folder is a python module, and each app is also a python module.
Supported platforms and prerequisites
py4web runs fine on Windows, MacOS and Linux. Its only prerequisite is Python 3.7+, which must be installed in advance (except if you use binaries).
Setup procedures
There are four alternative ways of installing py4web, we will guide you through each of them and if you get stuck, reach out to us.
Installing from pip, using a virtual environment
A full installation of any complex python application like py4web will surely modify the python environment of your system. In order to prevent any unwanted change, it’s a good habit to use a python virtual environment (also called virtualenv, see here for an introduction). This is a standard python feature; if you still don’t know virtualenv it’s a good time to start its discovery!
Here are the instructions for creating the virtual environment, activating it, and installing py4web in it:
python3 -m venv venv
. venv/bin/activate
python -m pip install --upgrade py4web --no-cache-dir
python py4web setup apps
python py4web set_password
python py4web run apps
Starting py4web is same with or without a virtual environment python py4web run apps
run cmd.exe
In e.g. folder c:\py4web
python3 -m venv venv
"C:\py4web\venv\Scripts\activate.bat"
python -m pip install --upgrade py4web --no-cache-dir
cd venv\scripts
py4web.exe setup apps
py4web.exe set_password
py4web.exe run apps
You can also find power shell scripts in the same folder. Starting py4web is same with or without a virtual environment python py4web run apps
Installing from pip, without virtual environment
pip is the basic installation procedure for py4web, it will quickly install the latest stable release of py4web.
From the command line
python3 -m pip install --upgrade py4web --no-cache-dir --user
Also, if python3 does not work, try specify a full version as in python3.8.
This will install py4web and all its dependencies on the system’s path only. The assets folder (that contains the py4web’s system apps) will also be created. After the installation you’ll be able to start py4web on any given working folder with
py4web setup apps
py4web set_password
py4web run apps
If the command py4web is not accepted, it means it’s not in the system’s path. On Windows, a special py4web.exe file (pointing to py4web.py) will be created by pip on the system’s path, but not if you type the –user option by mistake, then you can run the needed commands like this
python3 py4web.py setup apps
python3 py4web.py set_password
python3 py4web.py run apps
Installing from source (globally)
This is the traditional way for installing a program, but it works only on Linux and MacOS (Windows does not normally support the make utility). All the requirements will be installed on the system’s path along with links to the py4web.py program on the local folder
git clone https://github.com/web2py/py4web.git
cd py4web
make assets
make test
python -m pip install .
py4web setup apps
py4web set_password
py4web run apps
Also notice that when installing in this way the content of
py4web/assets folder is missing at first but it is manually created
later with the make assets command.
Notice that you also (and should) install py4web from source inside a virtual environment.
Running from source without installing
In this way all the requirements will be installed or upgraded on the system’s path, but py4web itself will only be copied on a local folder. This is especially useful if you already have a working py4web installation but you want to test a different one. Also, installing from sources (locally or globally) will install all the latest changes present on the master branch of py4web - hence you will gain the latest (but potentially untested) code.
From the command line, go to a given working folder and then run
git clone https://github.com/web2py/py4web.git
cd py4web
python3 -m pip install --upgrade -e .
Once installed, you should always start it from there with:
./py4web.py setup apps
./py4web.py set_password
./py4web.py run apps
If you have installed py4web both globally and locally, notice the ./ ; it forces the run of the local folder’s py4web and not the globally installed one.
python3 py4web.py setup apps
python3 py4web.py set_password
python3 py4web.py run apps
On Windows, the programs on the local folder are always executed before the ones in the path (hence you don’t need the ./ as on Linux). But running .py files directly it’s not usual and you’ll need an explicit python3/python command.
Installing from binaries
This is not a real installation, because you just copy a bunch of files on your system without modifying it anyhow. Hence this is the simplest solution, especially for beginners or students, because it does not require Python pre-installed on your system nor administrative rights. On the other hand, it’s experimental, it could contain an old py4web release, DAL support is limited and it is quite difficult to add other functionalities to it.
In order to use it you just need to download the latest Windows or MacOS ZIP file from this external repository. Unzip it on a local folder and open a command line there. Finally run
./py4web set_password
./py4web run apps
(omit ‘./’ if you’re using Windows).
Notice: the binaries many not correspond to the latest master or the latest stable branch of py4web although we do our best to keep them up to date.
Upgrading
If you installed py4web from pip you can simple upgrade it with
python3 -m pip install --upgrade py4web
Warning
This will not automatically upgrade the standard apps like Dashboard and Default. You have to manually remove these apps and then run
py4web setup <path to apps_folder>
in order to re-install them. This is a safety precaution, in case you made changes to those apps.
If you installed py4web in any other way, you must upgrade it manually. First you have to make a backup of any personal py4web work you’ve done, then delete the old installation folder and re-install the framework again.
Running Using uv
This is the newest way to manage python packages. Install uv as shown here: https://docs.astral.sh/uv/getting-started/installation/ Then run:
uv run py4web.py run apps
More uv command examples are in the provided Makefile
First run
Running py4web using any of the previous procedure should produce an output like this:
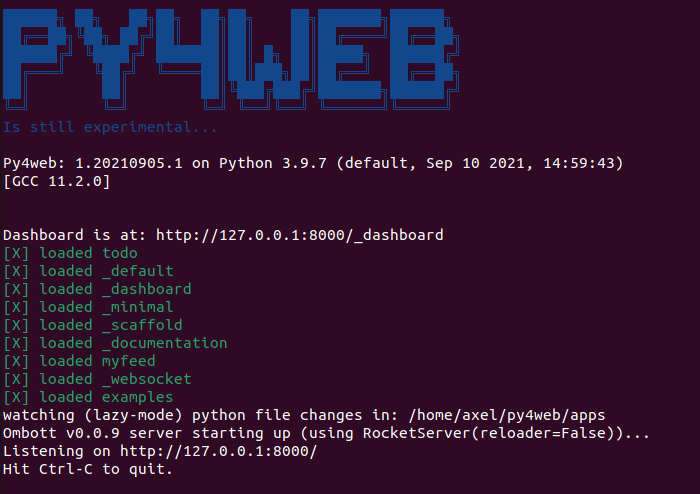
Generally apps is the name of the folder where you keep all your
apps, and can be explicitly set wit the run command.
(Yet nothing prevents you from grouping apps in multiple folders with
different names.) If that
folder does not exist, it is created. PY4WEB expects to find at least
two apps in this folder: Dashboard (_dashboard) and Default
(_default). If it does not find them, it installs them.
Dashboard is a web based IDE. It will be described in the next chapter.
Default is an app that does nothing other than welcome the user.
Note
Some apps - like Dashboard and Default - have a special role in py4web and therefore their actual name starts with _
to avoid conflicts with apps created by you.
Once py4web is running you can access a specific app at the following urls from the local machine:
http://localhost:8000
http://localhost:8000/_dashboard
http://localhost:8000/{yourappname}/index
In order to stop py4web, you need to hit Control-C on the window where you run it.
Note
ONLY the Default app is special because if does not require the “{appname}/” prefix in the path, like all the other apps do.
In general you may want to symlink apps/_default to your default app.
For all apps the trailing /index is also optional.
Warning
For Windows: it could be that Ctrl-C does not work in order to stop py4web.
In this case, try with Ctrl-Break or Ctrl-Fn-Pause.
Command line options
py4web provides multiple command line options which can be listed by running it without any argument
# py4web
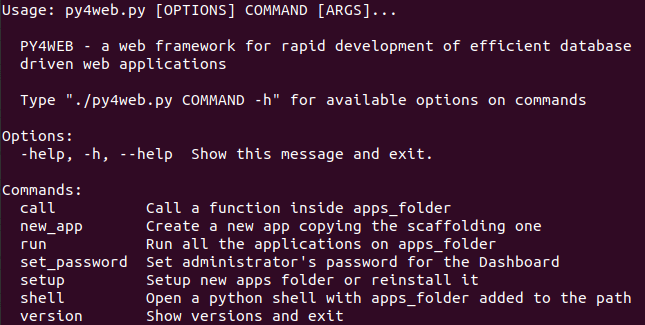
You can have additional help for a specific command line option by running it with the –help or -h argument.
call command option
# py4web call -h
Usage: py4web.py call [OPTIONS] APPS_FOLDER FUNC

  Call a function inside apps_folder

Options:
  -Y, --yes          No prompt, assume yes to questions  [default: False]
  --args TEXT        Arguments passed to the program/function  [default: {}]
  -help, -h, --help  Show this message and exit.
For example:
# py4web call apps examples.test.myfunction --args '{"x": 100}'
where myfunction is the function you want to call in apps/examples/test.py. Note that you have to use the single and double quotes just as shown for parameters to work.
new_app command option
# py4web new_app -h
Usage: py4web.py new_app [OPTIONS] APPS_FOLDER APP_NAME

  Create a new app copying the scaffolding one

Options:
  -Y, --yes                No prompt, assume yes to questions  [default:
                           False]

  -s, --scaffold_zip TEXT  Path to the zip with the scaffolding app
  -help, -h, --help        Show this message and exit.
This currently gives an error on binaries installations and from source installation (locally), because they miss the asset zip file.
run command option
# py4web run -h
Usage: py4web.py run [OPTIONS] APPS_FOLDER

  Run the applications on apps_folder

Options:
   -Y, --yes                       No prompt, assume yes to questions
   -H, --host TEXT                 Host listening IP  [default: 127.0.0.1]
   -P, --port INTEGER              Port number  [default: 8000]
   -A, --app_names TEXT            List of apps to run, comma separated (all if
                                    omitted or empty)
   -p, --password_file TEXT        File for the encrypted password  [default:
                                    password.txt]
   -Q, --quiet                     Suppress server output
   -R, --routes                    Write apps routes to file
   -s, --server [default|wsgiref|tornado|wsgiref+threaded|rocket|waitress|gunicorn|gevent|gunicorn+gevent|gevent+websockets]
                                    Web server to use (unavailable: waitress,
                                    gunicorn, gevent, gunicorn+gevent,
                                    gevent+websockets)
   -w, --number_workers INTEGER    Number of workers  [default: 0]
   -d, --dashboard_mode TEXT       Dashboard mode: demo, readonly, full, none
                                    [default: full]
   --watch [off|sync|lazy]         Watch python changes and reload apps
                                    automatically, modes: off, sync, lazy
                                    [default: lazy]
   --ssl_cert PATH                 SSL certificate file for HTTPS
   --ssl_key PATH                  SSL key file for HTTPS
   --errorlog TEXT                 Where to send error logs
                                    (:stdout|:stderr|tickets_only|{filename})
                                    [default: :stderr]
   -L, --logging_level INTEGER     The log level (0 - 50) [default: 30
                                    (=WARNING)]
   -D, --debug                     Debug switch
   -U, --url_prefix TEXT           Prefix to add to all URLs in and out
   -m, --mode TEXT                 default or development  [default: default]
   -help, -h, --help               Show this message and exit.
The app_names option lets you filter which specific apps you want to serve (comma separated). If absent or empty
all the apps in the APPS_FOLDER will be run.
By default (for security reasons) the py4web framework will listen only on 127.0.0.1, i.e. localhost.
If you need to reach it from other machines you must specify the host option,
like py4web run --host 0.0.0.0 apps.
The url_prefix option is useful for routing at the py4web level. It allows mapping to multiple versions of py4web
running on different ports as long as the url_prefix and port match the location. For example
py4web run --url_prefix=/abracadabra --port 8000 apps.
By default py4web will automatically reload an application upon any changes to the python files of that application.
The reloading will occur on any first incoming request to the application that has
been changed (lazy-mode). If you prefer an immediate reloading (sync-mode), use
py4web run --watch sync. For production servers, it’s better to use py4web run --watch off in order
to avoid unneded checks (but you will need to restart py4web for activating any change).
Note
The --watch directive looks for any changes occurring to the python files under the
/apps folder only. Any modifications to the standard py4web programs will always require a full
restart of the framework.
The default web server used is currently rocketServer, but you can change this behaviour with the server option.
Rocket3 is the multi-threaded web server used by web2py stripped of all the
Python2 logic and dependencies.
The logging_level values are defined in the logging standard python module. The default value is 30 (it corresponds to WARNING). Other common values are 0 (NOTSET), 10 (DEBUG), 20 (INFO), 40 (ERROR) and 50 (CRITICAL). Using them, you’re telling the library you want to handle all events from that level on up.
The debug parameter automatically sets logging_level to 0 and logs all calls to fixture functions. It also logs when a session is found, invalid, saved.
set_password command option
# py4web set_password -h
Usage: py4web.py set_password [OPTIONS]

  Set administrator's password for the Dashboard

Options:
  --password TEXT           Password value (asked if missing)
  -p, --password_file TEXT  File for the encrypted password  [default:
                            password.txt]

  -h, -help, --help         Show this message and exit.
If the --dashboard_mode is not demo or none, every time
py4web starts, it asks for a one-time password for you to access the
dashboard. This is annoying. You can avoid it by storing a pdkdf2 hashed
password in a file (by default called password.txt) with the command
py4web set_password
It will not ask again unless the file is deleted. You can also use a custom file name with
py4web set_password my_password_file.txt
and then ask py4web to re-use that password at runtime with
py4web run -p my_password_file.txt apps
Finally you can manually create the file yourself with:
python3 -c "from pydal.validators import CRYPT; open('password.txt','w').write(str(CRYPT()(input('password:'))[0]))"
password: *****
setup command option
# py4web setup -h
Usage: py4web.py setup [OPTIONS] APPS_FOLDER

  Setup new apps folder or reinstall it

Options:
  -Y, --yes          No prompt, assume yes to questions  [default: False]
  -help, -h, --help  Show this message and exit.
This option create a new apps folder (or reinstall it). If needed, it will ask for the confirmation of the new folder’s creation and then for copying every standard py4web apps from the assets folder. It currently does nothing on binaries installations and from source installation (locally) - for them you can manually copy the existing apps folder to the new one.
shell command option
# py4web shell -h
Usage: py4web.py shell [OPTIONS] APPS_FOLDER

  Open a python shell with apps_folder's parent added to the path

Options:
  -Y, --yes          No prompt, assume yes to questions  [default: False]
  -h, -help, --help  Show this message and exit.
Py4web’s shell is just the regular python shell with apps added to the search path. Notice that the shell is for all the apps, not a single one. You can then import the needed modules from the apps you need to access.
For example, inside a shell you can
from apps.myapp import db
from py4web import Session, Cache, Translator, DAL, Field
from py4web.utils.auth import Auth
version command option
# py4web version -h
Usage: py4web.py version [OPTIONS]

  Show versions and exit

Options:
  -a, --all          List version of all modules
  -h, -help, --help  Show this message and exit.
With the -all option you’ll get the version of all the available python
modules, too.
Special installations
There are special cases in which you cannot or don’t want to use one of the generic installation
instructions we’ve already described. There is a special folder called deployment_tools in
the py4web repository that collects some special recipes. They are briefly described here, along
with some tips and tricks.
HTTPS
To use https with the build-in web server (Rocket3) these are the steps:
Generate the localhost certificates. For example followed the instructions here:
Restart your browser and browse securely to your web site.
If you use VSCode to run py4web you may want to update the py4web launch.json file to contain:
"configurations": [
        {
            "name": "py4web",
            "type": "debugpy",
            "request": "launch",
            "module": "py4web",
            // or "program": "${workspaceFolder}/py4web.py", if you didn't install py4web as a package
            "args": [
                "run",
                "apps",
                "--ssl_cert", "/path_to/localhost.crt",
                "--ssl_key", "/path_to/localhost.key",
                "--server", "rocketServer",
            ]
        }
    ]
Notice that /path_to/ should be the absolute path to the location of your certificate.
WSGI
py4web is a standard WSGI application. So, if a full program installation it’s not feasible you can simply run py4web as a WSGI app. For example, using gunicorn-cli, create a python file:
# py4web_wsgi.py
from py4web.core import wsgi
application = wsgi(apps_folder="apps")
and then start the application using cli:
gunicorn -w 4 py4web_wsgi:application
The wsgi function takes arguments with the same name as the command line arguments.
Deployment on GCloud (aka GAE - Google App Engine)
Login into the Gcloud console and create a new project. You will obtain a project id that looks like “{project_name}-{number}”.
In your local file system make a new working folder and cd into it:
mkdir gae
cd gae
Copy the example files from py4web (assuming you have the source from github)
cp /path/to/py4web/development_tools/gcloud/* ./
Copy or symlink your apps folder into the gae folder, or maybe make
a new apps folder containing an empty __init__.py and symlink the
individual apps you want to deploy. You should see the following
files/folders:
Makefile
apps
  __init__.py
  ... your apps ...
lib
app.yaml
main.py
Install the Google SDK, py4web and setup the working folder:
make install-gcloud-linux
make setup
gcloud config set {your email}
gcloud config set {project id}
(replace {your email} with your google email account and {project id} with the project id obtained from Google).
Now every time you want to deploy your apps, simply do:
make deploy
You may want to customize the Makefile and app.yaml to suit your needs.
You should not need to edit main.py.
Deployment on PythonAnywhere.com
Watch the YouTube video and follow the detailed
tutorial
. The bottle_app.py script is in
py4web/deployment_tools/pythonanywhere.com/bottle_app.py
Deployment on Docker/Podman
On deployment_tools/docker there is a simple Dockerfile for quickly running a py4web container. There is also
a docker-compose.yml file for setting up a more complex multi-container with PostgreSQL.
A ready docker example based on the Scaffold application can be cloned from this repository <https://github.com/macneiln/docker-py4web-scaffold>
Note that you can use them also with Podman, which has the advantage of does not requiring sudo and does not running any background daemon.
Deployment on Ubuntu
On deployment_tools/ubuntu there is a bash script tested with Ubuntu Server 20.04.03 LTS. It uses nginx and self-signed
certificates. It optionally manage iptables, too.